© Owlbbaking, LLC. Unauthorized use and/or duplication of this material without permission from owner is strictly prohibited. Click here for round-up feature consent.
This easy Mardi Gras King Cake recipe is my favorite way to celebrate the Mardi Gras holiday. This New Orleans style cake is soft and fluffy! Decorated with purple, green and gold sprinkles, it's easy to understand why this cake is one of the best parts of the celebration!

(this recipe was updated on 1/8/22)
I've never been to New Orleans, but it is high up on my wish list of places to go! The community, the music, the food...from what I've heard, there's no other place like it! Since I live up north, it's hard to get into the Mardi Gras spirit, however, I find I have a much easier time with this cake in front of me.
Aside from the Creole and the French Quarter, the first thing that comes to mind for most of us is that New Orleans is most well-known for Mardi Gras.
The carnival lasts for days leading up to Ash Wednesday, and what better way to ring in Lent than with an amazingly, festive cake.

Out of all the great food surrounding the holiday, I would say king cake is one of the most well-known Mardi Gras recipes.
What is King Cake?
If you never heard of king cake, you may have heard of kings cake, Mardi Gras cake, or New Orleans cake.
No matter the name, the cake we're talking about here is super soft and pillowy; kind of like a cross between a coffee cake and pastry. King cake is made from a yeast-based dough and is very light and airy.

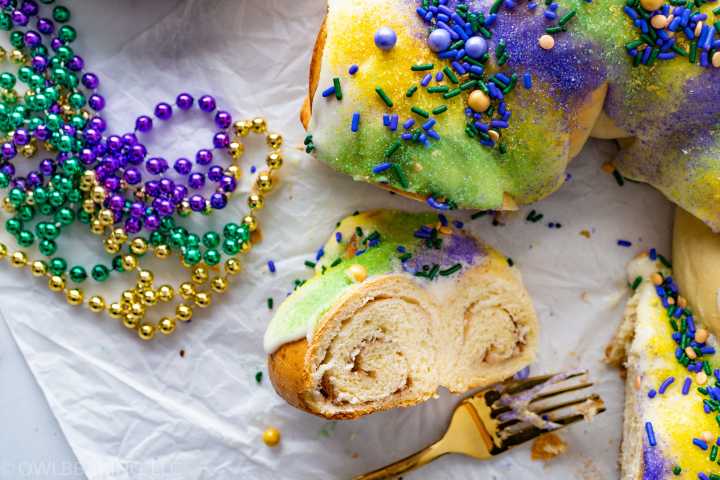
Traditional king cake (the version I made here) has a cinnamon swirl that runs through the layers. I've read this is how it was made originally back in the day, although some others might be filled with fruit, cream cheese or pralines.
There are two characteristics that are always constant; the cake is braided or twisted into a circle and the top is covered with a thick glaze and traditional gold, purple & green sprinkles.

Why is there a baby in a King Cake?
Normally, you can find a small figurine hidden somewhere in the King Cake- usually, it's a small plastic baby.
Why?
I did some research and there's a lot of ambiguity around this tradition.
History says, whoever finds it can be ruler for the day, but I've also read that it simply means that it's that person's turn to buy the next cake.
I didn't add a baby into my cake here, but it's definitely something fun to look into (FYI - it's probably best to insert the figurine inside the cake AFTER baking, and be careful that the person who gets it doesn't choke, that's always my fear, hah!)
How to make this Easy King Cake for Mardi Gras
The first time I tasted King Cake, I didn't think it was something I could ever replicate at home, but I do have to say, it was pretty straightforward to make! For some reason, working with yeast always scares me.
This looks like a lot of steps, but as are most recipes that require a yeast dough.
I promise you it's worth it to make this king cake New Orleans recipe!
Making the Dough
I always get very intimidated working with yeast, but I promise this is really easy!
First, you want to mix up the ingredients for the dough and need it. I think it's easiest to use the dough hook attachment on the stand mixer, but you could do this by hand.

The dough is ready when it is soft, very elastic and nothing should stick to the sides of the bowl.
Set the dough aside in an lightly greased bowl for about an hour.
Allowing the Dough to Rest
This is one of the most important steps that cannot be skipped when making this cake. It's important for the yeast to have time to work its magic and take time to rise. If you skip the steps that allow the dough to rest, you won't have a soft and fluffy cake which is imperative to make this an authentic king cake recipe.
After some rest time in the bowl, the dough should have doubled in size.
The key to achieving great results is finding a warm spot for it to rest. This can be more difficult in the winter.
My trick to ensure the dough rises properly is to stick the bowl of dough in the oven with the light turned on. Do not turn the oven on.
The reason I do this is because the oven is a completely sealed area where no cold air can get in. By turning on the light, the warmth from the oven light is enough to help the dough rise.
The ideal environment for yeast to grow and develop is 75°F to 78°F.
Since the dough had time to rest, it should double in size. You can see HOW MUCH the dough filled out the bowl here.

Shaping the Dough
Once the dough has risen, divide the dough into two halves.
Roll each ball of dough into a large rectangle and spread the softened butter onto the surface.


Follow with a heavy sprinkle of cinnamon and sugar.

Roll up the dough, like you're making cinnamon rolls.

Be sure to pinch the seam of dough so it stays together.


Take the two logs (seam side down) and twist them together to form a ring. You can do this by laying one log down straight, on your surface and then gently lay over the other log, then the other to "twist" them together.


I did my best to secure the two ends together, it doesn't have to be perfect!!

The dough ring should rise again for another 20 minutes before baking and you should notice some difference in size.

Decorating Your King Cake for Mardi Gras
The icing on this cake is SO GOOD! You can use either butter or cream cheese but I highly recommend using cream cheese. That little bit of tang goes so well with the cake.
Another great thing about this icing is that it's on the thicker side.
The icing will drip down the sides to cover any imperfections, and that explosion of color will distract anyone from noticing places where the seams of the dough didn't meet perfectly.

As mentioned, purple, green, and yellow are the most traditional colors for Mardi Gras cakes.
After adding the glaze, I alternated the colored sprinkles all around the top of the cake.
To make this cake a bit more fancy, I bought some premium sprinkles that had different shapes and styles and added those as well. Here's the link to the exact one I used.

Oh, and if you're wondering what those colors represent! Purple is for justice, green is for faith, and gold represents power!
Looking for more desserts to celebrate the Mardi Gras holiday?
I have a cookie decorating course that teaches you how to make hundreds of cookie designs using easy to follow templates, and of course I have some for Mardi Gras!!


Traditional King Cake
This easy Mardi Gras King Cake recipe is my favorite way to celebrate the Mardi Gras holiday. This New Orleans style cake is soft and fluffy! Decorated with purple, green and gold sprinkles, it's easy to understand why this cake is one of the best parts of the celebration!

- Total Time: 2hrs + 45 min
- Yield: 1 cake
Ingredients
For the Dough
- ¼ oz of active dry yeast (2 ¼ teaspoon OR 1 packet)
- ¼ cup warm water (100° to 110°F)
- ½ Tbsp granulated sugar
- 8 oz full fat sour cream
- 2 Tbsp granulated sugar
- 2 Tbsp unsalted butter
- ½ teaspoon salt
- 1 large egg (lightly beaten)
- 3 to 3 ½ c bread flour (all purpose can also be used!)
For the Filling
- ⅓ cup unsalted butter (softened)
- ½ cup granulated sugar
- 1 ½ teaspoons ground cinnamon
Glaze
- 3 c powdered sugar
- 3 Tbsp cream cheese, softened (butter can also be used)
- 2-4 tablespoon milk
- 2 Tbsp fresh lemon juice
- ¼ tsp vanilla extract
- Purple, green and gold sprinkles to decorate
Instructions
- In a glass measuring cup or small bowl, stir together yeast, warm water, and sugar and let stand for 5 minutes. The yeast should become foamy and be 'activated' after that time.
- Add first 4 ingredients in a medium saucepan over low heat OR into a microwave safe cup. Heat using the stove or microwave, stirring often until the butter is melted. Remove from the heat & cool down the mixture to 100° to 110°F.
- In the bowl of a stand mixer with a dough hook attachment, add the sour cream mixture, yeast mixture, egg and half of the flour.
- Give a quick stir with a spatula and then turn the mixer on medium speed. As the ingredients start to come together, reduce speed to low, and gradually add the remaining flour until a soft dough forms.
- Once the dough forms, lower the speed setting and allow the dough to knead until smooth and elastic (this can take up to 10 minutes). The dough should not be sticky or too dry. It should release from the sides of the bowl.
- Place in a lightly greased bowl and cover with a linen cloth or plastic wrap. Let rise in a warm place (75-78° is ideal) for 1 hour or until the dough has doubled in size.
- After the dough is finished proofing, divide the dough in half.
- Roll a portion of dough into a long rectangle using a rolling pin (about 16" in length and 8-9" in width).
- Spread HALF of the ⅓ cup butter evenly on the rectangle, leaving a 1-inch border.
- In a small bowl, combine the sugar and cinnamon and sprinkle HALF the amount evenly over the butter.
- Roll the dough (like a cinnamon roll) from the bottom up, ensuring a tight roll.
- Pinch the seam tightly.
- Repeat steps 8 - 12 with the other portion of dough.
- Next, form the cake. Place the dough rolls seam side down on a sheet lined with parchment. Pinch one of the ends together, and twist the dough logs over each other to give a braided look. Bring the other ends around together to form a ring, ensuring to make a good seal at the seam.
- Cover and let rise in a warm place again, 20 to 30 minutes or until doubled in size.
- Preheat the oven to 350°F.
- Bake for 25 to 35 minutes or until golden.
- After the cake is done baking, allow to cool most of the way.
- Meanwhile, in a large bowl mix the glaze ingredients until smooth & creamy using a hand mixer.
- Pour glaze evenly over warm cake; sprinkle with colored sugars, alternating colors and forming bands.
- Let cool completely & serve.


Notes
Recipe adapted from: MyRecipes.com
This recipe originally made 2 cakes, but upon updating it I halved it, but as per feedback from readers, I kept the amount of filling the same which makes this cake even better.
If you want to make 2 cakes, simply double the ingredient amounts!
This cake is best served same day, but will store 2-3 days at room temp. The color of the sprinkles may bleed into the icing over time.
- Prep Time: 2 hrs + 20 min
- Cook Time: 15


Michele says
It tasted ok, but I read the reviews and cooked it a few minutes longer and checked the temp. I think mine got too done and a lot of the filling leaked out onto the pan. It was an easy recipe.
Becky says
What are the approximate dimensions of the finished cake? I'm trying to plan what size cake round to serve it on.. thanks!
Kim says
Made this recipe and loved it! In the future I think I will double the cinnamon sugar and butter and see how I like that - also any tips on how to modify this recipe to include a cream cheese filled element? Thanks!
Twila says
Made it yesterday & frosted today, don't know how it tastes, but looks fantastic!!
Theresa says
I made this recipe last year and again today. It is absolutely delicious and everyone loves it! There is only one small piece left and I have claimed it for myself.
Tiffany Davis says
The recipe says first 4 ingredients, which ingredients?
Maggie says
I’m confused about this as well… because the first four include the sour cream, but then the NEXT step tells you to add the sour cream.
Also, after reading the comments, confused on how many packets of active dry yeast to add. (Each packet is 1/4 oz = two 1/4 teaspoons).
Wynter says
I'm excited to try this cake. I'm wondering how many people does it serve?
JENNIFER says
Do you use a baking sheet or a bundt pan for this cake
Liz says
A baking sheet! 🙂
JENNIFER says
Do you bake this on a baking sheet or a bundt pan?
Kate F says
This was delicious! Thank you
Liz says
I'm so glad!! 🙂
Jessi says
What’s the deal with the yeast? 2 1/4 teaspoon? Or 2 1/4 ounce? They are not the same.
Liz says
Hi Jessi! I can see how it was confusing how I had it written. It's two, 1/4 oz packages. I've updated the recipe.
Linda says
I think you may have mis-read the recipe Jessi. It calls for 2 - 1/4 oz. pkgs. of yeast. In other words it is 1/2 oz. total. Hope this clarifies the directions.
Leslie says
Made this the other day. The bread of the cake was delicious, however it lacked the cinnamon sugar flavor and the lemon in the icing overpowered the cake. I followed the tips and did bake it for 30 min. I recommend using a thermometer to check the temp for doneness. Next time I make this, I will use brown sugar instead of regular (implied in the recipe) and will omit the lemon for the icing.
Jennifer Dulaney says
I’ve made this cake twice and it’s delicious. I did have to bake it considerably longer than the recipe states both times. Also, I doubled the filling recipe the second time so that each tube of dough got the full filling recipe. I definitely liked more cinnamon. I really enjoyed the addition of lemon juice to the glaze. Great, festive recipe!
Liz says
Thank you so much for the comment and for sharing! I definitely have to try this with double filling. I'm so glad you liked the recipe!
Brenda says
Hi! And I made this cake last night and it came out lovely. I did cook it longer closer to 35 minutes. I took the internal temperature as another posted recommended. I’m wondering though if I did something wrong. It was pretty skimpy on the filling. Have you played around with amounts and flavors?? Thanks 🙂
Liz says
Hey Brenda! Yes, I love that tip on taking the internal temp! Hmm, I haven't played around with the filling and flavors but now you've sparked my interest! 🙂
Ashley says
I made this cake today! Very tasty, but a bit under-baked. I left mine in for nearly 30 minutes and still have found some pockets that weren't quite cooked all the way through. It still tastes yummy though!
Liz says
That's definitely happened to me - this one is a little tricky to bake! Glad you liked it all the same! 🙂
JENNINE says
Made this recipe today for my husband who is from Louisiana, he loved it. I however was a little disappointed that I didn't bake it longer. It was not baked all the way through, next time I'll bake longer or try and make the rounds thinner. Overall, very tasty.
Liz says
Thanks so much for taking the time to comment, Jennine! 🙂 I'm glad you liked the recipe!
Pam says
I take the temp of my bread to be sure it’s done, 195-210 degrees.
Liz says
That's a great tip!!
Jennifer says
This is such a great recipe! It turned out wonderfully, even though I botched the 2nd proof (room was too cold). Will definitely try again.
Liz says
I'm so glad you liked it!! 🙂 hahah it's hard during the winter months!
Kasindra Van Meter says
I'm going to make this tomorrow and I too live in a cold climate. I use my oven as a proofing box. I put 3 cups of boiling water in a loaf pan in the bottom of my cold oven and then put the dough (in its greased bowl covered with saran wrap) in the oven and close the door. this provides a warm, moist environment that the dough loves to proof in! I hope this helps!
Liz says
Thanks for sharing this tip!! I would have never thought of that!
Cristina says
Hi! I’m from New Orleans but live in Virginia - this is the closest I can get to what I get at home - thank you! Oh also, it’s called a king cake bc you represent the three kings searching for baby jesus. Mardi Gras is a season that starts on Epiphany (three kings day on Jan 6th) and ends the day before Lent. Locally, little kids will get one on Fridays at school - whoever gets the baby to be special for a day - but also has to bring in the king cake the next week during Mardi Gras season.
Liz says
Hi Cristina! Thank you for the kind words!! I'm so glad you love the recipe and thanks for sharing more history on this fun tradition!!
kendra says
For the filling, can I use cream cheese? Would I replace butter with cream cheese or just add some?
Liz says
Hey Kendra! I think it would be fine to use cream cheese, using it in exchange for the butter.
Audrey A Harmon says
Hi, Liz! Do you live at sea-level? I grow up BELOW sea level, and now I'm in Denver for school. I have the hardest time baking up here. For example, this cake was in the oven FORTY minutes longer than what you call for in your recipe. There was nothing wrong with the rising process, everything went so smoothly until the end. Even then, it was still a little doughy! Nevertheless my roommate loves what I originally came up with. Thanks!!
Liz says
Hey Audrey! Wow, yeah being in Denver will definitely make a difference! I believe my area is at about sea-level so I haven't had to alter my baking at all. I'm glad you & your roomie still liked the recipe!! 🙂
Hunter says
How long is this shelf stable? Or does it need to be stored in fridge? And if so, how long can it be refrigerated?
Liz says
Hi Hunter! This cake can be left on the counter for a few days (I would say 3-4, 5 is probably fine). Storing it in the fridge would extend the shelf life to 5-6 days, but it may dry out in the fridge. I did read online that you can also freeze it for up to 3 months!