© Owlbbaking, LLC. Unauthorized use and/or duplication of this material without permission from owner is strictly prohibited. Click here for round-up feature consent.
It's Puppy Party (or Pawty as I like to say) time! A fun mix of human sweets & puppy-approved treats! Host a puppy or dog birthday party with these fun ideas!


 When a good friend of mine called and told me she was having a birthday party for her puppies, I nearly died with excitement...this is the cutest idea in the entire world!! Since I don't have any doggies of my own yet (for now, I am but a simple cat mom) I was so thrilled to be a part of planning this party.
We came up with 3 adorable treat ideas and I knew I just had to share with you guys.
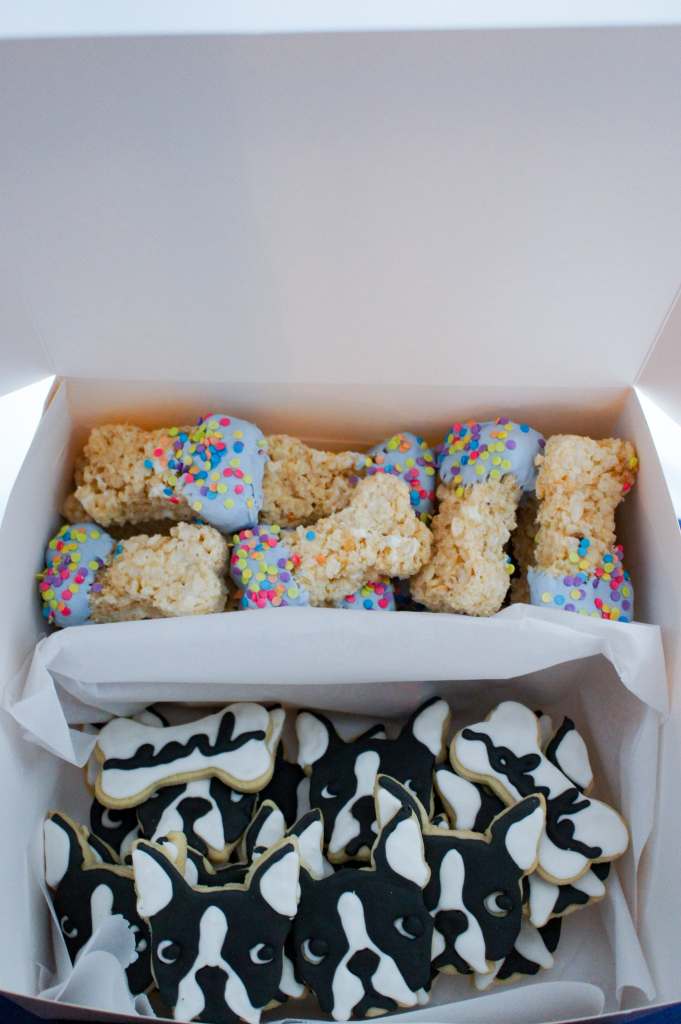
-Boston Terrier Sugar Cookies - She has two Boston Terriers, Earl & Duke. Most adorable puppers ever.
-Bone Shaped Crispy Rice Treats
-Cupcakes for the pups
-And I surprised her with adding paw shaped candy pops (I saw the mold and just HAD to make them).
How to Make Boston Terrier Sugar Cookies
Starting with the Boston Terrier Cookies, we got a Boston Terrier cookie cutter similar to this one. This cutter was incredibly easy to work with. All you had to do was roll out the dough and press the cutter in as you normally would. The outline of the face cuts out the cookie and the rest of the mold makes a beautiful imprint of the other features. If you choose to leave your cookies plain, the cutter creates a beautiful as-is imprint of an adorable doggy face.
 On the flip side, if you're feeling adventurous and want to ice them, the outlines are already there for you. Simply fill in with a black and white design.
I am by no means a cookie-decorator expert. I tend to avoid cookie decorating altogether- it's so intimidating!! But I wanted to give it a go to really make these cookies pop, and you know what? It was easier than I thought! I'm really glad I pushed myself outside my comfort zone; it took some patience but it worked out great because all I had to do was follow the design imprinted on the cookie. Easy peezy!

If you haven't experimented with decorating cookies before, it really is pretty easy. Just know that there is some drying time involved. To avoid color bleed and to achieve this look, you'll need to ensure there's plenty of time ahead for drying!
For the royal icing, I used Americolor Super Black and kept the white plain. I used a Wilton No. 2 Round Decorating Tip to decorate the cookie.
Here's the process for decorating:
- Use the black first, to outline the shape of the face and nose. Allow to dry FULLY for overnight or 24 hours.
- Then, using the white icing, trace along the ears, nose and fill in the eyes.
- Allow to fully dry again.
- Lastly, make the eyeballs by piping thicker black icing on top of the white.

I just love all the doggy faces. Omg.

Crispy Rice Bone Treats
Next I made Crispy Rice Treats in the shape of dog bones, dipped in candy melts and topped with some fun confetti sprinkles. I used this dog bone cookie cutter set to get the shape just right. I melted white candy melts, dyed it a soft, denim blue (Wilton's W610-228 Icing color: Delphinium Blue) and topped with these sprinkles.
These took no time at all to make and decorate. Just make the cereal treats, cut out the shapes and decorate. The kids loved these!


Cupcakes for Pups
I had no idea what to put into a puppy cupcake. My first thoughts included some kind of concoction made of pumpkin, peanut butter and bacon. But, how would that bake into an actual cupcake? Luckily we found this cake mix on Amazon that is just for dogs. It even came with frosting mix!
I ordered the pumpkin cake mix and it baked up beautifully, just like normal cake. To be honest, it actually smelled so amazing as it baked in the oven and it made me start craving pumpkin bread. There are countless 5 star reviews on this mix...I think it was the right choice!
My only disappointment was, I was expecting the icing mix would have produced a fluffy frosting (I just had that idea planted in my mind lol) but it actually turned out to be a glaze. It was really hard to work with (I even used less water than the instructions said to produce a thicker glaze).
Using a bit of food coloring (which is safe for dogs!) I dyed the icing to match the mini dog bones that topped each cupcake. I also tried to do more of a drip effect to pretty them up; in my opinion they still came out absolutely adorable.
Oh, I forgot to mention these are mini cupcakes. Perfect pup size.
(Icing colors: I used Americolor Mauve for the lighter pink/purple and Americolor Mauve + Americolor Super Black for the darker purple)


Paw Pops
Last but not least, the candy pops!!
I started off by melting some candy melts, and piping them into the tiny paw print areas using the No. 2 decorating tip. I found that by using the tip and piping the candy in was the easiest way to make exact outlines. Once you have the small areas done, give the entire mold a tap against the counter top to get rid of any air bubbles. Then, take the color that you'll use for the entire paw print and spoon it into the mold. Tap on the counter again.
Lastly, place the sticks into the mold, cover the stick with a bit more melted candy and tap. Pop them into the fridge for at least 10 minutes or until set.
Once set, flip the mold over onto a clean paper towel and the candy pops should fall right out.

Here are the products you'll need to create these adorable favors.
-Candy Melts (in white & chocolate)
-Food coloring (again, I used Americolor Mauve for the pink)
It was SO fun making these treats and sharing the love with some adorable pupper friends!
Comment below if you've ever had a pawty for your pups, I'd love to hear about it!

Sugar Cookies
This is my favorite sugar cookie recipe for using cookie cutters (and stamps). The dough holds every shape perfectly and they have a beautiful flavor and delicate, buttery crumb!
Ingredients
- 1 c unsalted butter (room temperature)
- 2 oz cream cheese (room temperature (I've subbed with extra butter, which works too if you don't have cream cheese on hand))
- 1 c sugar
- 1 large egg
- 1 egg yolk
- 1 tsp pure vanilla extract
- ½ tsp almond extract
- 3 c all purpose flour
- 1 ½ tsp baking powder
- ½ tsp salt
Instructions
- In a large bowl. combine the butter, cream cheese and sugar in the bowl until light and fluffy.
- Add the egg, egg yolk, and extracts and beat until well combined, scraping down the sides and bottom of the bowl well.
- Add in the flour, salt and baking powder and mix just until combined- stop mixing once the dough begins to form.
- Cover the bowl with plastic wrap & refrigerate the dough for 30min.
- Preheat the oven to 325°F.
- Once the dough is finished chilling, divide into thirds (doesn't have to be exact. Take one third at a time and roll the dough out on a floured surface to about ¼".
- Cut with desired cookie cutter and place onto a tray lined with parchment.
- Bake for 10-15 minutes, checking after 10 minutes, until the edges just begin to brown (my cookies took closer to 15min).
- Repeat with the remaining dough. Any dough scraps can be combined and used. Do not reuse dough scraps more than 3x- it begins to dry out.
- Let cool completely before decorating.
Notes
Recipe by HottieBiscotti.com
*If using this recipe with the Boston Terrier cookie cutter, the dough needs to be rolled out a little more thin, as the impression will not work well with thick dough.

Perfect Royal Icing
Royal Icing that is easy to work with and does not dry too hard. Ideal for frosting thick, soft sugar cookies!
- Yield: 1 cup of icing
Ingredients
- 2 tbsp meringue powder
- 3 tbsp warm tap water (+ more for thinning)
- 2 tsp fresh lemon juice
- 2 c powdered sugar
Instructions
- Using a hand mixer, whisk together the meringue powder and tap water in a bowl until foamy, about 45 seconds.
- Add the powdered sugar & lemon juice. Combine until smooth, adding water ¼ teaspoon at a time if necessary until desired consistency is achieved.
.
.
.
I test it by running a knife through the middle of the icing- you should see the icing separate but flood back within a few seconds. Or, if you drizzle it with a fork the icing should be thin enough to continuously stream off the fork, but thick enough to hold a drizzle shape on a surface. - Add food coloring as desired and pipe onto cookies. Allow to dry for at least 3 hours on a sheet pan, or until hard enough to stack.
Notes
Recipe by Owlbbaking.com

Bakery Style Crispy Rice Treats
This childhood favorite is extra buttery with pops of marshmallows throughout which create a beautiful soft texture.
Ingredients
- 1 stick butter
- 3 10oz bags mini marshmallows
- 12 c crispy rice cereal
- pinch of sea salt
Instructions
- Prepare a large, deep dish pan (a roasting pan or lasagna pan) by spraying it with nonstick spray (you can also put a piece of parchment on the bottom to ensure the treats won't stick).
- Measure out the cereal into a large bowl and set aside.
- In a large stock pot on medium heat, add the butter and begin to melt.
- Once fully melted, fold in 2 ½ bags of marshmallows using a wooden spoon or heatproof spatula.
- Once the marshmallows are coated in the butter, keep stirring until the marshmallows are fully melted. The mixture should be completely smooth.
- Pour the cereal into the pot and gently fold the mixture together. Add the remaining ½ bag of marshmallows.
- Once the mixture is totally combined, pour it into the prepared pan.
- Spray your hands with nonstick spray and push the cereal mixture evenly into the pan.
- Allow to set for at least an hour. Cut into huge squares.
Notes
Recipe by Owlbbaking.com
I like to use a large pan with high sides to create huge squares. I find a lasagna pan works best.


Comments
No Comments